I’ve been printing for a few years and I’ve developed a comfy little groove(rut) for the prep and settings I use when printing. Lately I’ve been trying to watch other Printers(with a capital “P”, as in “those people who print) and see what I could learn from the things we do differently. I came across a Printer with a very large following, but my sensibilities were rocked when I saw that he prints with a brim every single time (at least from what his pics and videos showed). SCANDALOUS!
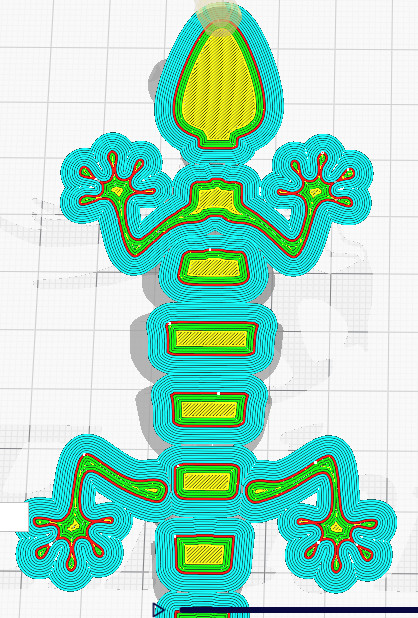
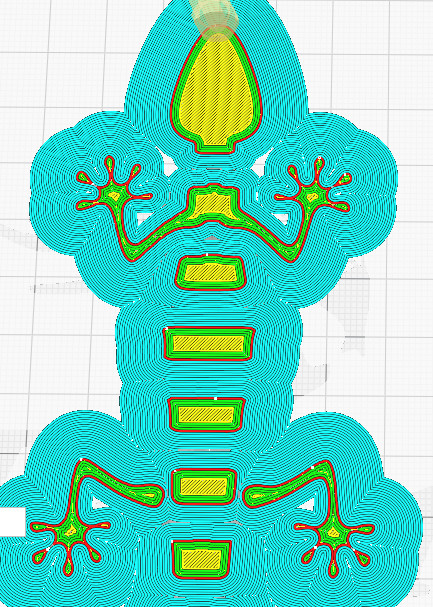
So first off, in case you don’t know what it means to use a brim when 3D printing, it’s a way of improving how the print sticks to the bed. Basically take every place that the model makes contact with the print bed on the first layer, and wrap it in concentric lines of plastic. This greatly increases the amount of contact between the model and the bed. Every layer above the first layer prints normally without any additional plastic. When the print is finished, the brim can basically be peeled away from the main model since it is only one layer thick.
|
First layer, |
First layer, |
First layer, |
So brims help the first layer stick, and obviously that is a good thing, but are they for extreme cases or do they belong in a Printer’s every day toolbox? Here are the main qualities I associated with brims (before giving them any serious thought)
- - They probably help adhesion, but rafts seemed more stable.
- - I didn’t think brims were truly necessary. If you can dial in your speeds and temperatures, that should cover most cases where brims would be used.
- - Adding brims results in wasted plastic. Unless you have a filament recycler, it’s just printed trash.
- It results in wasted time. Just like the wasted plastic, any time that your printer spends printing throwaway brims is time not spent printing something cooler.
- - It increases post-processing time. The brim has to be removed by tearing or cutting it off.
- - Removing the brim can damage the print. All contact points between fused plastic have the risk of leaving scars and marks when separated.
But after seeing prints from this guy fully embracing the brim lifestyle, I decided maybe I should look into it again and see if he was on to something I had missed. I decided to run some casual tests to see if actual experience might change my biases. Since the brim is really all about adhesion, I tried to think of ways to take advantage of that quality. Clearly, it should raise the success factor for printing models that contain small contact points with the bed. Less obviously, the increased adhesion means I should be able to ramp up my first layer speed without worrying about smaller pieces not sticking properly. (Personally I run my first layer pretty slow because I get reliable results that way. If brims let me print that layer much faster, that would be a good reason to use them more.)
For my tests, I decided to print the Articulated Lizard v2 by McGybeer. This is one of my favorite models and I print a lot of them to give away so I’m familiar with how that design likes to print and how it likes to fail. It has a number of very small body segments and I have had many many failed lizards due to lost adhesion, which made the model perfect for what I wanted to test.
I loaded the lizard model into Cura, and set things up to print in PLA on my Creality Ender 3. (I had to enable the extra brim options to see and change them.) For those of you following along at home, I set Cura up with the following settings (based on Low Quality defaults)
- Layer Height: .28mm
- Infill: 10%
- Hot End Temp: 205
- Bed Temp: 55
- Top/Bottom Layers : 3
- Walls : 2
- Print Speed : 75 mm/s
- Initial Layer Speed: 25 mm/s
- Use Brim and set Brim Lines to 8
- Est Time to Print : 1 hour 44 minutes Est PLA needed: 13g / 4.51m
(For fun, I checked what would happen if I used 20 brim lines instead of 8. The time increases to 1 hour 49 minutes, and PLA needed would be 14g / 4.83 m.)
To compare with my normal method, I also checked with my brimless-preferences, which are basically the same as above, but no brim and initial speed set to 10 mm/s. The print would take 1 hour 45 minutes, and use 13g / 4.24m. Based on these estimates, i did eke out a tiny speed advantage by printing faster with a brim, and the 8 ring brim increased the amount of plastic needed by about 6%. Those numbers would change a lot depending on what you’re printing but that gives some idea of the…brim-pact…
And then I actually printed one.
The results? Really good, actually. Adhesion seemed perfect, perhaps too perfect, as I was printing on a glass bed and had to wait longer than usual for it to cool enough to remove. The brim came off of the model pretty easily by peeling it away. There were a couple of places I had to use my fingernail to finish an edge. Even though it came off easily, it did leave some marking and discoloration where the brim was peeled away. Although it was easy and only took a few minutes, if you’re printing a lot of things, adding just a few minutes of post-processing time to every print would add up. Also, there were times when I could not tell if I was removing the innermost layer of the brim (which would be good) or the outermost layer of the actual print (which would be bad). And this may sound vague, but something about the bottom edge is just “off.” My best guess is that because Cura draws out the brims and then prints the model inside them, maybe the brim is acting as a mold and changing the shape of the bottom layer from what I am used to. You don't have to take my word for it though.
After the first test, I ran another test with similar settings, except I used a .16mm layer height. Since the brim is only one layer thick I wanted to see if there was any noticeable decrease in adhesion. Nope, none that I could tell.
The last test (that I completed) was to print in PETG, which can be a little more high maintenance than PLA. It needs higher temperatures and slower speeds, and in my experience still has more adhesion issues and a greater tendency to warp or curl.
- Settings were the same as above, with the following changes:
- Hot End Temp: 240
- Bed Temp: 75
- Top/Bottom Layers : 4
- Walls : 4
- Print Speed : 75 mm/s
- Initial Layer Speed: 15 mm/s
- Est Time to Print : 1 hour 54 minutes Est PLA needed: 19g / 5.81m
- The extra time and material was due to the additional walls in the PETG profile.
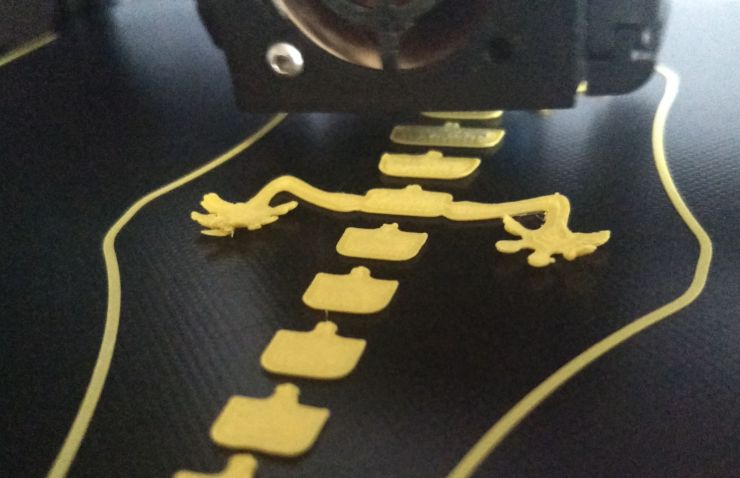
While printing the PETG lizard, I noticed one of the first brim segments to print was not laying right. I canceled and restarted the print and had the same issue happen again, but decided to let it run and see what happened. In this case, it managed to complete successfully. Had this defect been on the body of the lizard without a brim being printed, it probably would have slipped off at some point and crashed the print. The downside is that the PETG brim was way tougher and more brittle than the PLA. It didn’t really peel off, I had to break it off in pieces, and the edges seemed sharp. I think I would have to sand or file them before letting anyone handle it.
I should add that real-world experience showed one more brim advantage I hadn’t thought about…preventing curling. The extra adhesion helps hold the print in place so it cools evenly. I was going to print a “control” lizard without a brim but I had my room fan on while printing it. A few layers in, the print started getting a terminal case of curly-toes. I canceled the print (and was tired of testing by that point) and closed the book on this brim experiment.
 |
| Uneven temperatures made this lizard start crawling off the bed... |
So what does this all really mean? Technically, most of my early observations still seem true, but I have a deeper appreciation of the benefits brims offer now. Am I going to change my methods and start using brims all the time? Not really. Generally I think it’s better to print without them when possible (and I get a sick kick out of obsessing over ideal settings and fixing things on the front end instead of post-processing). I can now see a number of cases where brims would not just be a crutch, but would be a real difference maker.
- - For prints that have small points of contact with the bed and need extra adhesion. This could include generated supports that are separate from the model but can still fail and crash.
- - For cases where edge curling from the bed might be an issue. This can happen based on printer location, model shape, or printing material.
- - If you are getting "Elephant Foot" on your prints because you have to print really hot for adhesion, a brim could fix your adhesion so you could lower your temps, and that would help with the issue.
- - In cases where you’re so frustrated with 3D printing, and just need an extra boost to make a print succeed and give you confidence to keep trying. I'm not kidding. Printing can be frustrating, and some days you just need a win.
- - In short: If you really want your print to stick right the first time and not shift off the bed, and don't mind the cleanup afterwards.
Here are some cases where brims might be your buddy, or they might work against you.
- - For precision parts. Helping to avoid curling and maintain the original shape would help a lot in most precision printing I have done, but if the bottom edge needs to be precise, it’s possible that some of the brim will be left behind or some of the model will be removed with the brim.
- - For printing in PETG, ABS, or other materials that are tougher than PLA and less flexible - The print will be much more likely to succeed with a brim, but it may take a lot of work to clean up the brim remnants (yeah, brim-nants) when it’s finished.
As a final comment, the waste generated by a brim is one of the main reasons I’ve avoided them, but this is not a perfect world and waste is a relative thing. Based on my little tests, a brim greatly decreases the chance of a print failing from lost adhesion, even on small touchpoints. Intentionally using and losing a few grams of plastic might sometimes be better in the long run than having to scrap a large print that failed halfway through and used way more plastic than that. Same thing for time…10 minutes of brim printing could have the potential to prevent a devastating adhesion failure 12 hours into a print.
So how about you? Are you a big ol’ fan of brims? Or do you think they’re just a cog in a bigger conspiracy by the filament manufacturers to increase our consumption? If you’ve got any personal brim experience you want to share, let us know!

